Welcome Everyone!

Remember to "click" on all pictures if you'd like to see them a little closer.

Sunday, December 30, 2012

He's a good guy? Yah, right.

Hi, I hope everyone is enjoying some rest and relaxation after Christmas.  It was a very crisp and snappy -25 degrees here for Christmas Day, but things have warmed up considerably and all the children have been playing outside, happily, with their new sleds and skates!

Every year my sister and I look forward to seeing the pictures of our grandchildren with Santa.  It's just one of those traditions that we love.  So far, my all-time favorite is this one that I have scrapped today.  It is of her youngest grand-daughter last year and the expression on her face says it all.


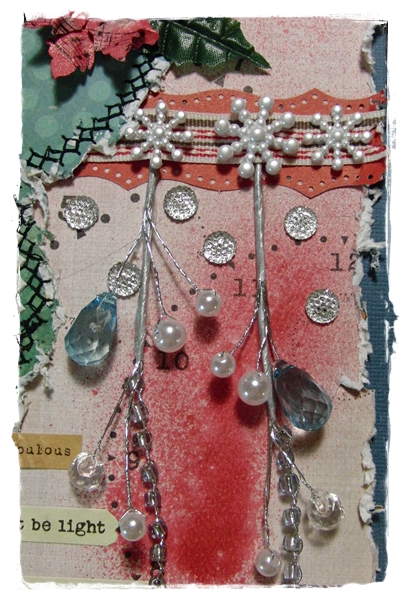
This layout was pretty straight forward to do.  I used Martha Stewart punches to make the outer and inner borders, and then framed the photo with a mat and some lace.  The floral embellies were stuff I had in my stash, but the two blue roses were from a sweet fellow crafter at the crop where I was making this.  She offered them to me after watching me working on it and I was just thrilled as they fit so perfectly!  Don't you just love the friends you make doing this wonderful obsession hobby?


I didn't have a large candy cane, so I searched the internet and found a child's colouring page with one and made a pattern for the candy cane from it.  Then I just paper pieced it together 
and added some glitter and a bow.

Christmas is so hectic and busy, that sometimes it just totally overwhelms us.  I always love the peace and quiet of the following week, where I can reflect on all the concerts and visiting, 
and enjoy my photos (if I remembered to take them!).  
It's the perfect time to remember the following quote by Calvin Coolidge:

Christmas is not a time or a season,
But a state of mind.
To cherish peace and goodwill,
To be plentious in mercy,
Is to have the real spirit of Christmas.

Wishing you all much peace and goodwill,
Linda


Saturday, December 22, 2012

O Holy Night!

I was playing with Gelatos this week.  I see now why everyone is talking about them.  They're alot of fun to work with!


I started out by embossing the snowflakes on the tag and then coloured over them with a combination of these gelatos:

 
Now I have to admit, I thought "eek" at this stage of the  tag:
 
 
But I swirled the colours around with my finger, and sprayed some water on,
and things started to look better. 
BUT ... the purple blob in the middle... oh no... NOT the look I was going for:
 
 
Not to worry, go in and add some more colour where you feel it's needed:
 
 
and you end up with a beautiful glowing tag:
 
 
For the card background, I did the same thing, only left out the purple colour in order that the tag would stand out against the blue. 
The chippie was also painted with Gelatos.  This time I rubbed a bit on my craft mat, and smeared a little water in, making it into a paint which I then brushed on.  It was a little light in colour, so I painted over the Gelatos with several different colours of Smooch accent ink, outlined the chippie with a black Pitt pen, and then stamped a little bit of gesso here and there to soften it up.
 
 
The flower started out looking like this:
 

I sprayed it with black Smooch spritz, and rubbed in the purple Gelato here and there, dabbed it in glue and then glitter, and added some beads to the center, and it became this:

 
And that's it!  Throw in a little bit of burlap, and a little bit of bling, and you're done!
 
I apologize for my "plain" looking blog right now.  Something has happened with Blogger and my wallpaper is gone.  :( 
I will try and figure out what has happened, after Christmas, coz you know, right now it's CHRISTMAS and my list of "to do's" is still pretty LONG!  LOL.
 
Hope you all have a wonderful weekend and finish off YOUR lists!
 
Linda


Saturday, December 15, 2012

Icycles and Snow

I had a lot of fun doing today's layout.  Got to work with pictures of my favorite little boy (my grandson naturally!!) and used circles as a feature, which I've never done before.  I was able to use this layout in two challenges:  my team-mate in the Swirlydoos Round Robin 
used circles in her layout, which I was to "lift",
and there was a challenge at the Flying Unicorn to make circles your focal point.


I used a lot of different techniques on this: distressing, misting,
sewing (somewhat crooked lol), inking.

 
The ruffle around the picture was made using Tim Holtz's tissure tape.  I like how it doesn't stick permanently and can be re-positioned as you're working with it.
 

These hanging icycles came from a bargain I found at Michael's ... YAY... love bargains!!

 
50% off!!  :)
 
 
I added some tissue tape to this chipboard, inked the edges, and had the perfect backing for a title:
 
 
And then the final touch, that no layout can be without .... flowers
 
 
Love Timmy's Tattered Pointsettia die.  Making the flowers was so quick and easy with it!  Add some shots of Tattered Angels "Scarlet" glimmer mist and pearl beads, and we were done.
 
Season's Greetings to all!
Linda


Friday, December 14, 2012

New Chipboard Company!!

There's a new chipboard company in town and I'm lovin' their stuff!!! 
Check out their site ... they're having a fabulous give-away!


Sunday, December 9, 2012

Winter Bird

Hi everyone,

I was inspired by Alda over at Flying Unicorn, to make today's card.  Here is her beautiful card that I fell in love with. 


Scrapbooker's Paradise has a challenge on right now to use a Winter Bird theme, and the Flying Unicorn has a challenge to make a card or a tag in a different shape than usual.  Here's what I came up with.

 
Here in Alberta, I think one of the most beautiful winter birds is the Blue Jay. 
I cut the lovely shape of the card with my CTMH Artiste Cricut cartridge.
I used the "fill the page" setting, and the card is about 4-1/2" x 4-1/2".
That cartridge makes it so easy! 
After the card was cut, I used this "Belleek Inspired" technique that I learned from Kittie Caracciolo (totally LOVE her cards). This technique is so easy and it makes the snowflakes just pop out!
 
On her card, Alda used an Aileen's product called Glitter Snow to coat the edges of all her mats, as well as the flowers.  I didn't have that so I had to improvise.  I put about a teaspoon of Light Modeling Paste on my craft mat and sprinkled in a small amount of fine glitter.  I mixed it really well with a spatula and it worked just great.  You can see it all around the edges of the card, as well as on the decorative mat.  I also put some on the Pointsettia and button down at the bottom corner.  It seems to be very durable and is standing up well to "flexing"... nothing has chipped off.
 
You can't really tell on the photograph, but I put liquid pearls on the flourishes and it gives them a nice shine to match all the sparkle and glimmer that is going on everywhere else.
 
 
Here's a little closer view.
 
 
I did a side by side of these two pointsettias in order that you can see the difference that
adding the Modeling Paste makes. 
The coated Poinsettia looks like it has a layer of beautiful, glittery snow!
Thank you Alda for the wonderful inspiration!
 
I encourage you all to check out the challenges by clicking on the links above. 
They are a lot of fun....and....there are prizes to be won!!!
 
Wishing you all the best,
Linda


Saturday, December 8, 2012

My "Rocker" Husband

Hi everyone,

Gee, Dec 8th ... need I say more????  What's a person to do, time is racing, chores are piling up... yikes.  I love all the concerts and music and decorating, but what I HATE is trying to fit housekeeping chores in there too.  YUCK.  Talk about ruining a girl's fun.  :) 

I decided to deal with it all today by turning the Christmas music on and just going full bore at everything that's been piling up.  (We're talking no room on the kitchen counters anymore.  *smile*)  (While I'm confessing... there's no clothes to wear either.  *NOT smiling anymore*)    The music's at the highest volume too.... for some reason it only motivates me when the whole neighbourhood can hear it!  But fun... I'm singing along ... a little rustily...and things are getting done.  What helps you at this time of year??  Give me tips ... I need HELP!!!

But back to scrapping,  this is a layout of my husband that I did for another Swirlydoos challenge

 
The picture of Gordon was taken at our son's wedding a couple years ago, when he was convinced to play a tune during the service. (I don't think he has played in front of an audience since his young "rocker" days when he played in a band at local dances.) 
 
We were to use a rock song for inspiration and grunge it up big time.  It was a lot of fun ... I really attacked the background paper with water and mist and a lot of scrunching and tearing! 


I had a great time making these zipper embellishments ... I just rolled them around in different shapes until I liked what I saw... and then added some screws!  For the guitar, I used "The Drunken Scotch" technique on it which uses Aileen's Tacky Glue, Alcohol Inks and a heat gun. 
You can find a video tutorial here
I kept practising on little pieces of chipboard until I got the colours working the way I wanted them to.  The colour of alcohol ink that I used was "Stream".

 
 The small picture was taken in the '70's when we were first married. 
And yes, our children laugh often, at his resemblance to Hyde from "That 70's Show"! 
I can tell you, his personality was/is the same too.  *laughing* 
 
That's it for today! 
Take care, and if you're feeling stressed about Christmas,
put some carols on and dance around your kitchen in your socks.
It's guaranteed to get you back in the proper spirit!! 
 
Linda


Saturday, December 1, 2012

A Trip to Banff

This summer, my daughter and I needed to get away and relax, so we decided to go to Banff for the weekend.  (We are very fortunate that we live not far from one of the most beautiful parks in Canada.)

I used some of the photos from that trip, in this layout for the November Swirlydoos round robin challenge.  Jan challenged us to make it a multi-photo layout and use specialty papers.  In addition, we were to make a flower from them.
001
I added the tissue paper to the background with mod podge and misted it.
004
Then I made the top left hand flower out of tissue paper following Tim Holtz’s tutorial.
003
We were also to use a rub-on in a new way, so I added the little black flowers to the letters in “you”.
002
I had just got a new mask that I wanted to try, and it seemed to fit the photos, so I used it in the background.  I stencilled it with molding paste that was mixed with some cool artist pigments called “Primary Elements” by Luminarte, in a Bolivian Blue colour.  (It was stepping outside my “comfort zone” to do the tree in blue, lol, but I ended up loving it.)
Banff is very beautiful, and is only an hour’s drive from Calgary.  If you’re ever in Alberta visiting, you really MUST go to Banff!

Thursday, November 29, 2012

Good morning everyone!

I promised to show you what I created in my craft room to work on, so here it goes.  This was my inspiration photo:
 
I got 2 desk top pieces from Ikea that were 23-5/8" wide and 78-3/4" long...
And screwed each end to the top of these 6 cube organizers that I got from Michaels...
 
 
This is what the table looks like with the two desk tops pushed together.  I found that the tables were so long, they needed some support in the middle, so I added another couple of the 6 cube organizers.  (Hey it was all good...more room to store stuff!!)  They are not screwed to the desk tops, they are just sitting there.
 
 
Then I purchased two of these Expedit drawer units from Ikea...
 
and pushed them in so they backed up against the organizers.


They fit perfectly, and I am able to store my cricut and vagabond on them.  The best thing is that they roll out and you have extra work space to use if you need it.  (You know... for all those Christmas cards you're working on right now.)  :)  On the other side of the table, it looks like this:
 
 
You can see where those middle organizers can now be accessed.  They sit in about a foot and a half, so they are easy to reach.  There is also room to store a stool to sit on, and I have my longer cutters tucked in the gap on the right.


These containers were purchased at Canadian Tire.  They store a TON of stuff. 
 
All in all, this table uses 6 of those organizers from Michaels, and it is 4' wide by 6-1/2' long.  I LOVE it.  So much room to work on and so much STORAGE!
 
Now I just need to get filling it up!  LOL
Hope I've given you some ideas for your room.  If you have any questions, just send me an email.  Have a great day everyone!
 
Linda


Tuesday, November 27, 2012

A Thrill for Me!

Hi everyone!

I wanted to share an honour that was bestowed upon me (I'm sounding a little "royal" aren't I? LOL) by Swirlydoos a few weeks ago.


This layout that I did of my granddaughter, was selected as "Layout of the Week" on Oct 28th.  

To say I was thrilled, would be an understatement!!  

When I joined the Swirly "Savages" back in 2011, they opened a whole new world of scrapbooking to me.... layers and textures, flowers and bling, ink and distressing... I was entranced, and have been learning new skills ever since.  

This group of ladies share their talent willingly and give unending encouragement.  I have been loving every minute of my time with them.  BUT, I never ever thought that something I did would be selected for layout of the week.  Thrilled? ... oh Yeah.... I'm still floating on cloud 9!  :)

Before I go, I'd like to show you a close up of the Hot Off The Press "Color Me" paper 
that I used as a mat.


I inked portions of it with some Distressed inks and let them flow over the lines.  Doesn't it give such a nice soft look to the layout?  I just loved using this paper.

These lovely butterflies were courtesy of Lisa Gregory:


She spoils us every month with a downloadable file of beautiful new butterflies to print out!

I've been working on my scraproom lately ... come back tomorrow and I'll show you the cool table my husband I built out of shelves, etc from Ikea and Michaels.  I love, love, love it!

'Til then .... enjoy your scrapping!

Linda

Monday, October 8, 2012

Erin Bledgen's October Giveaway


Hi everyone, I wanted to share with you this wonderful giveaway that Erin Bledgen is having over at her blog My Scrap Cabin.
You will enjoy visiting her blog because there is some stunning artwork to be seen there! Have a great time visiting!

Wednesday, August 15, 2012

A Quick Little Gift Box

Hi everyone! Hope the summer is going well for you all. We have had some ferocious storms the last couple of days in the Calgary area, but I hear we're in for some nice weather again now. That is good, because we need to get out with rakes, etc and clean up all the broken branches and flowers that were destroyed by the hail!! I needed a gift box to tuck a grad gift into, so got out some old "Bliss" paper from Close to My Heart and made this sweet little box. Very quick and easy. The lace flowers on the side are a new product from Close to My Heart that just came out August 1st.
It looks big in the photo, but is actually only about 6" wide. Here is a photo of the top.
And this is the little card that I made to go with it.
The lace doilies that are on the top of the box and the card, were made with the new Artiste Cricut cartridge that also just came out in August.
You get all this for just $99. If you want to take a peak at the 700 shapes that can be cut with this cartridge, send me a request by email to gpekrul@telusplanet.net, and I will send you a PDF file that shows them all. You will be amazed! Enjoy the remaining days of summer! Linda

Monday, July 16, 2012

Wedding Layout

I worked on this layout for a challenge over at Swirlydoos today. You have to lift your team mate's layout and make it your own. This is my team mate's (Jackie Clark) wonderful layout that I got to lift:
You can see more of Jackie's incredible work over at her blog Scraps of Brilliance. She also makes the most wonderful cards! For this challenge you received extra points for using black and white plus one other colour. That made the choice of a photo easy for me, because I have been planning on scrapping some of my son's wedding photos and their colours were black, white, and deep pink.
The paper line that I used is Bo Bunny's Enchanted. It comes with some beautiful coordinating embellishments and that is where I got the centers for my Gerber Daisies. To make them I used this flower from Close to my Heart's Art Philosophy Cricut cartridge.
I cut 2 black ones at 1-1/2", 3 black ones at 2-", 2 pink ones at 2-1/2", and 3 pink ones at 3". The little pink flowers that are on their own, were cut at 1'1/2" and then I scrunched them up to give them a ragged look. Down in the bottom, left-hand corner of the layout, I made a white flower embellishment from this Cricut shape from the same cartridge.
I inked it up and embellished it with some pearls and another Bo Bunny embellishment. Great fun! I encourage everyone to try doing some challenges. My favorite sites to go to are Swirlydoos and Flying Unicorn. There's always great inspiration and lots of friendly people to visit with!